

How To Create A Loft Bed
Our new year's resolution is to get the Riverside Retreat up and running ASAP, and in addition to our latest kitchen reveal, we've been making good progress in other areas! Anyone remember the downstairs bonus room?

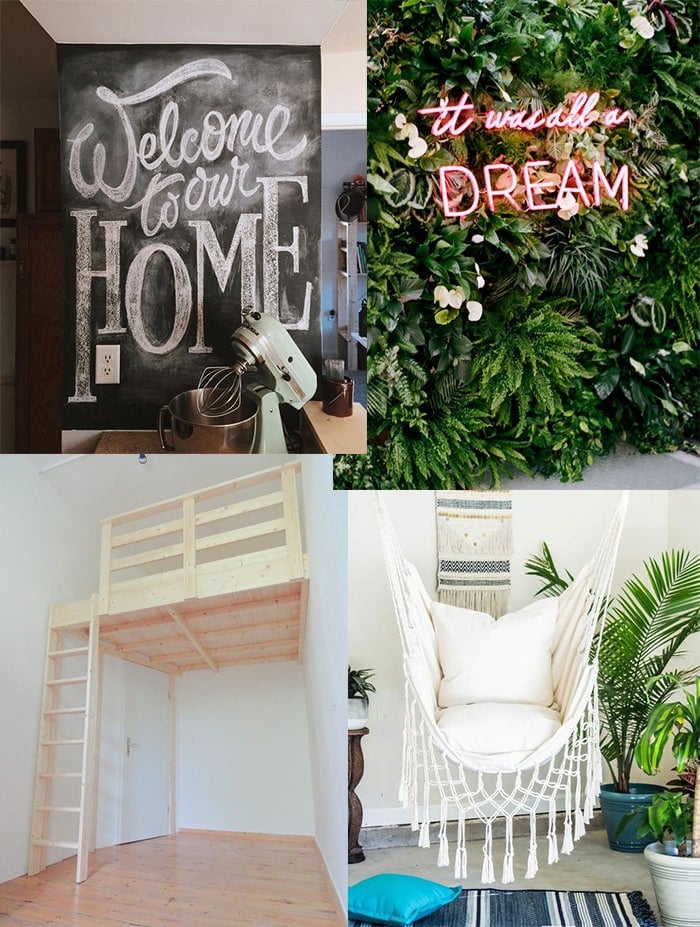
We built a reading nook on one end, tore down the closet and installed Pergo flooring throughout, but majority of the room had been ignored and used as tool storage (as the house has no garage). The plan is to make this the media/lounge room and go bold with the design—a floor to ceiling faux fern wall with a neon sign, loft bed, hanging chair and typographic wall mural. We're not holding back! I'll share the full design plans in an upcoming post, but here's an idea of the vibe…
To best utilize the long and narrow room (and create additional sleeping space to host more guests) we thought it would be fun to build a full sized loft bed in the recessed area of the former closet. Here's what it looked like originally:
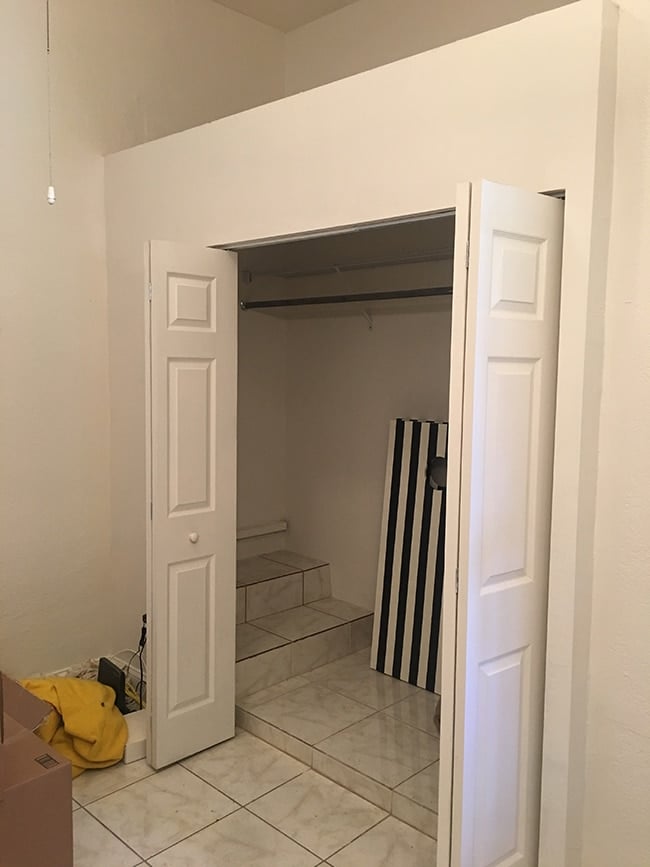
Once upon a time those steps led up to a door to the kitchen in the original house (this room is a converted carport). This is how the corner looked after demo + floor install:

It was the perfect nook for a bed! But how do we make it happen? It was a lofty goal (ha ha, get it?) to build this thing ourselves, especially with the holidays and a new(ish) baby and needing to get this house finished months ago. Lucas was looking forward to the challenge but I didn't think we had enough time and wanted to hire it out. Eventually I gave in and Lucas enlisted his dad's help to execute the vision (super technical drawing, I know):

The final result would end up pretty different, but it was a start. Lucas was confident he could figure it out so I let him take the reins and handed over complete control (minus a couple small creative decisions, of course 😉 I wasn't involved in the materials planning or present for any of the build, all of the documentation was done by Lucas and his dad. He even wrote up this tutorial for you guys (so if it is confusing, take it up with him :P)
Materials needed
Bed:
2x6x8 (3)
2x4x8 (8)
1x10x8 (2)
1x6x8 (1)
1x3x8 (10)
1x4x8 (1)
4×8 ½" plywood sheet (2)
4×8 beadboard sheet
Tongue and groove boards
Quarter round trim
Ladder:
1x4x8 (3)
Hooks
3" wood screws
1 ¼" wood screws
2 ½" wood screws
5" lag screws
4" bolts
Washers
Liquid nails
2" finishing nails
4" joist hangers
6" joist hangers
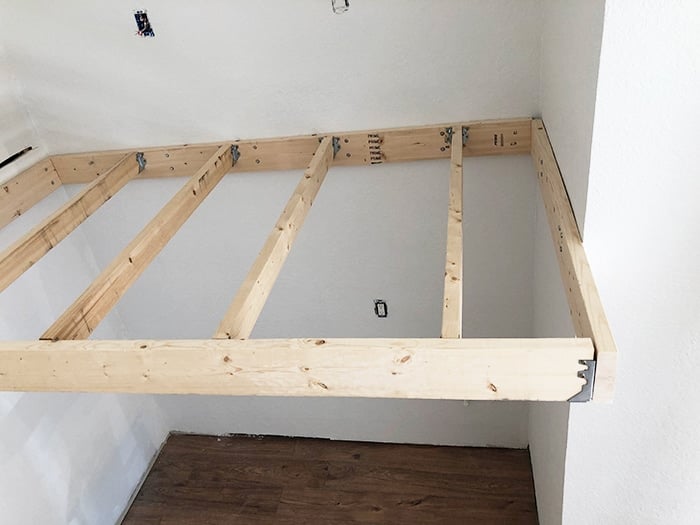
First we had to find the studs in the three walls. The wall at the head of the bed originally had a door leading to the kitchen, which was later filled and converted to a closet by the previous owners. The stud locations were a complete mystery, so I had to cut a strip in the wall to locate them (this wall will be covered, no worries). Our stud finder doesn't work reliably on plaster walls, so there was a lot of drilling small holes to find the studs on the other walls.

The 2×6's were attached to the three walls to create our bed frame. We used 5" lag screws and washers into the studs (at least two in each stud) to ensure it was as sturdy as possible.


For the fourth and final piece of the frame, we used joist hangers on each end:


Our frame was done!


The next step was to attach the 2×4 slats for the plywood mattress base to sit on. We used 2×4' joist hangers for these.


One of the slats was placed closer to the end where the ladder was going to go since it would get more traffic, and the remaining three were evenly spaced out.
The frame was now ready to put the plywood on top.

One sheet of plywood covered the majority of our frame, but we had to rip down a second piece to fill the remaining space. We screwed the plywood into the 2×4 slats to keep it in place.

It passed the safety test!

Next: building the headboard.
A headboard was needed because the entire back wall would be covered in faux greenery—not something you want to lean up against! A simple design was decided on, with tongue and groove boards to mirror the window wall in this room.

2×4's were used for the frame, and a few additional lag screws to attach the frame to the wall. We had to use a paddle bit to let the screw countersink about halfway into the 2×4 to ensure there was enough length to catch the wall stud.

The tongue and groove boards were cut down to size and attached starting from the bottom, using liquid nails and finishing nails.


We had to rip down the final piece to fit the size we chose, and finished it with a 1×6 along the top. We didn't worry too much about the gaps along the wall or below the 1×6, as we planned on putting quarter round along those edges.


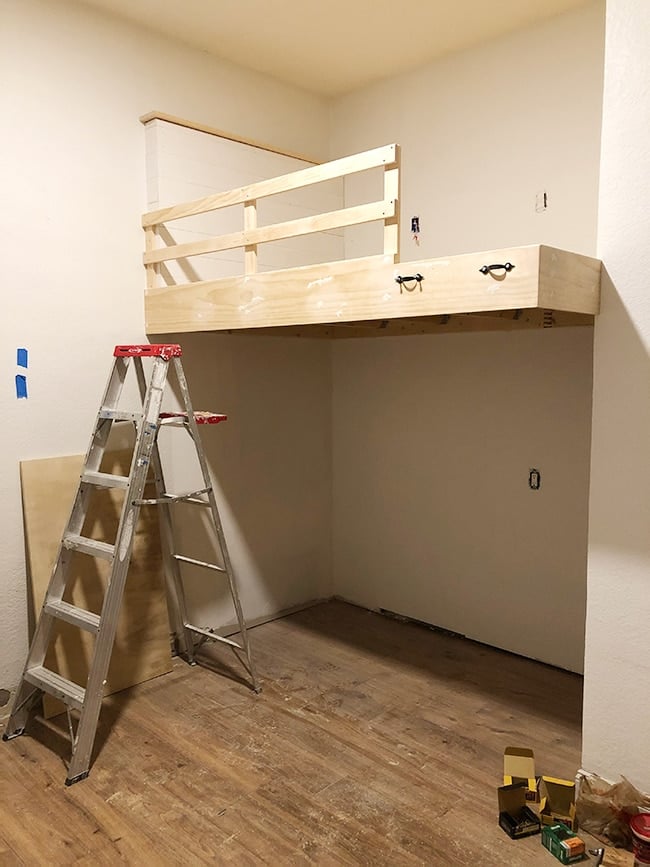
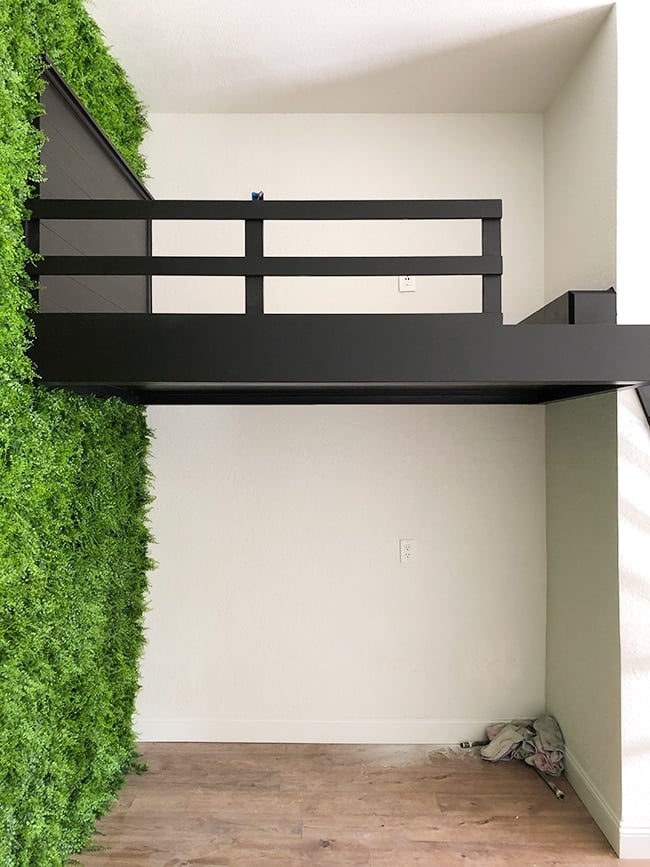
Next: install the railing vertical supports.
We started on the left, using wood screws to attach to the shiplap…

Since these verticals were going to be the main source of strength for the railing, we used 4 bolts that went through the 2×6 for additional support.


With the railing in place, we could now install the 1×10 that would serve as the finished front of the bed. We cut it down to length and notched out a section where we planned to mount the ladder (the ladder was moved here after we decided it would be too narrow at the bottom of the bed).

We had to notch out the back of the 1×10 where it hit the lag bolts on the vertical supports, so it could sit flush against the 2×6 frame.

The two handles in the photo above were going to be used to hook the ladder onto, so it could be removed and out of the way when not in use (we later removed them!)
We finished building the railing by attaching two more 1×3's for the horizontal pieces using 1.25″ screws (countersunk).

For the finished surface underneath the bed, a 4×8 sheet of bead board was screwed into the bottom of the 2×4 slats.

Extra 2×4 blocks were added on each end to secure the bead board to.

Rather than buy a second full sheet of beadboard to fill the space, a 1×6 board was used along the back edge to cover the gap.

1×3's were used along the remaining edges.


Since the heads of a few of the lag screws were sticking out where the trim was going, we had to use spacers throughout. I ripped down some pieces of scrap wood and attached them to the 2×6 using liquid nails.


We also ripped down a few smaller pieces to fill the gaps left around the vertical railing, between the plywood and 1×10". We could have notched the plywood out instead, but didn't think about it until we had already screwed it down.

Since our nook was 89" long and a normal full size mattress is 75", we decided to utilize the extra length and add a shelf at the end of the mattress for people to keep their belongings (phone, water, etc).

To do this, we built a simple frame out of 2×4's and clad it with finish grade plywood, making sure to miter all the edges for a cleaner look.

At this point we installed quarter round along the edges and used wood filler to cover the corners, screw holes, and finishing nail holes around the entire bed.


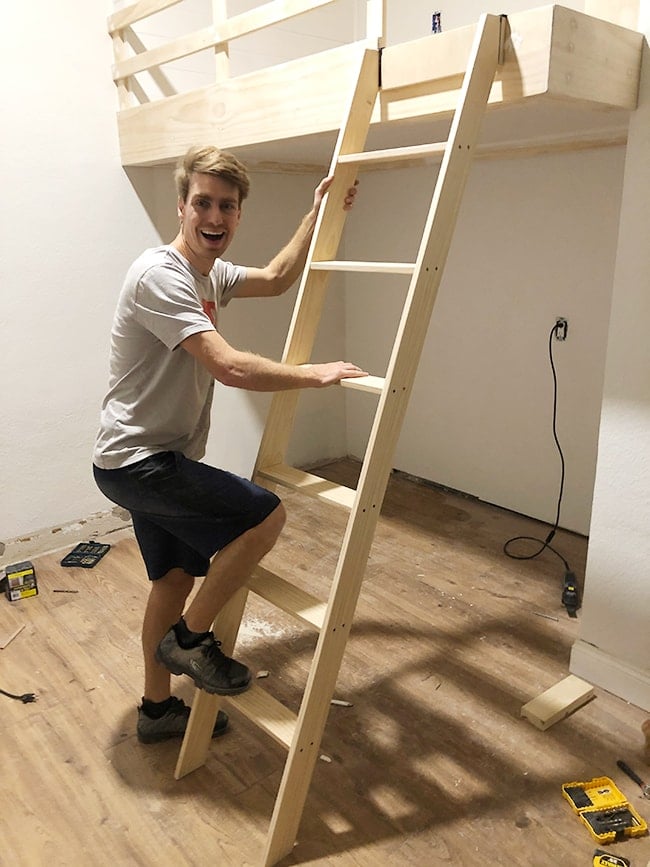
Next up: building the ladder
We liked the size and the angle of our 6' step ladder and decided to use it as a template. Having an example to copy allowed us to avoid trying to figure out those complicated cuts on our own!


We cut two of the 1×4's down to length for the sides, then used the angle finder to cut the top and bottom. The bottom was flush with the floor and the top edge sat flush against the 1×10 frame of the bed.


We then measured and laid out where the rungs would go:


The two side rails were attached at the top, using a ripped down piece of finish plywood and bunk bed ladder hooks we got on Amazon.

With the ladder hooked to the bed, we attached each rung, starting from the bottom, using two 2 ½" wood screws from each side.

We were very careful to make sure each rung was the correct distance apart as well as level. 2×4 blocks were used to ensure the spacing between each step was the same all the way up.

We also very carefully pre-drilled the holes to make sure the screws went straight in and didn't stick out of the top or bottom of the step.
For additional strength, we added another piece below each step and secured it with 3" wood screws from the side, and liquid nails on the top against the step.

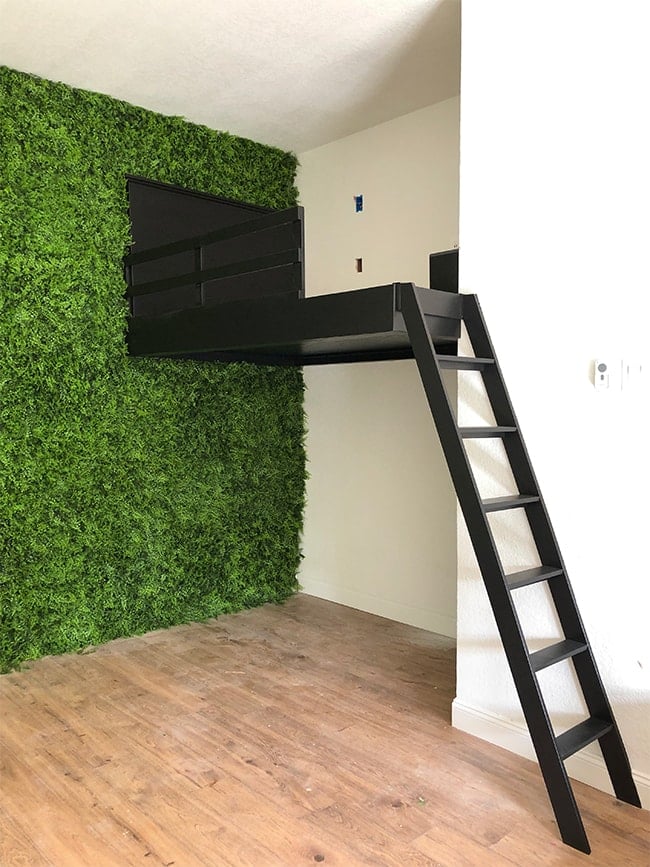
It was at this point that I tried moving the ladder against the wall like we originally planned. After we built the bed frame, I thought the spacing would be too tight to have the ladder permanently on that side, but after trying it out, we realized it was perfectly comfortable and easier to get up to the bed. Back to Plan A, and we were able to permanently attach the ladder to the wall and to the bed frame.

At this point all that was left to do was fill the remaining holes (most of the holes required two applications of wood filler, as the counter-sunk screw holes were too big to get a smooth finish after just one pass), and paint!

Of course, Jenna chose black. We used the same SW Tricorn Black (in semi-gloss) that we painted the sliding doors leading down into the room.

Most of the bed took just one coat of paint, with the exception of the bead board and a few touch ups.

Painting was completed over a couple days.

In total, this project was completed over the course of ten days (three full days, the rest evenings/a few hours at a time). Not the quickest project, but we wanted to take our time and had to figure a lot out as we went without a blueprint to follow. The total cost was around $400, but I already had a lot of the screws, liquid nails and paint on hand. Huge thanks to Dad for helping! I really enjoyed working with you on this one.

The paint was barely dry before we jumped right into the next project—our greenery wall!
Told you things were getting wild. I'll share a blog update with those details soon…
A pull-out sofa will go underneath the bed, and a TV mounted on the wall across from that. Here's the view from underneath the loft bed, looking towards the future TV:

Hang tight, more on the way!

How To Create A Loft Bed
Source: https://blog.jennasuedesign.com/2020/01/diy-loft-bed/
Posted by: torresdickclonsund.blogspot.com
0 Response to "How To Create A Loft Bed"
Post a Comment